
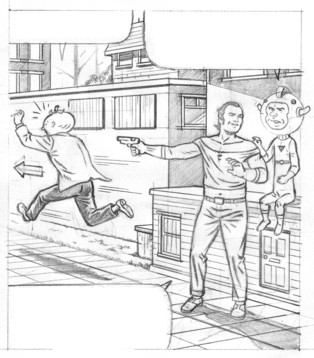
So I have a sketch I like and I want to add the background:


So I am assuming that the viewer is of an average height and is watching this scene while standing up (not sitting down or walking on stilts - just standing there, looking straight ahead). So now it is time to roughly figure out how tall that guy would be if you had to draw him as he watches the scene unfold. His eyes are on the horizon, where would his feet be?

Well, a person is around 7 to 8 heads tall (in my world...) so that will help me take a guess. Say his head is maybe 4cm long, so he'd be between 28 and 32cm tall. This line is actually only 26cm, but the top of his head is above the horizon, of course - just like the guy with the gun in the drawing.
So that blue line is the viewer, standing well in the foreground and looking at the scene unfold. I usually draw the "viewer" line near the middle of the sketch, at the "center of attention".
Now it is time to do even more guessing... I know I want the sidewalk to go off towards the left at a pretty good angle, so I start there. I use a ruler and try out a few lines - see what looks OK and decide on a vanishing point for that side.

The brickwall looks more or less like I want it, and a few lines I tried for some windows or whatever seem to work as well. They are not too steep or distorted so I go on and figure out where the vanishing point goes on the right side.
This is kind of the fun part - you get to do a bit of math and see if it's all going to work out or not. If not, you have to start all over again - but if it does, you can fill up the drawing pretty quickly.
The left vanishing point forms an angle with the viewer line - here's it's about 56 degrees. What I want (I'm not sure if it's correct to do it this way - but it's what I want...) is to make sure the right vanishing point and the left vanishing point add up to 90 degrees where they meet the viewer line. If I know the left one is 56 degrees, the right one will have to be 34 degrees.

So I mark that off on the paper and draw a line towards the right, until it hits the horizon. That's the second vanishing point.
Although it's 2-point perspective, there is a third vanishing point I always figure out before I get on to drawing the scene. It's the diagonal vanishing point, and it is very handy for lots of things.
The 56 degree and 34 degree points add up to 90 degrees - but the triangle is tilted (it kind of goes off to the right a bit in relation to the drawing). To find the diagonal vanishing point, you need to find the 45 degree point on the triangle. You can actually just use a triangle to do this, but I do it like this:


Which is very handy to draw things like tiles and carpets, but it's useful for a lot of other things, too. For me, it helps me get a sense of depth and size in a drawing. How far away are these people from each other, actually? I draw in the tiles and it helps give me an idea. Which then gives me an idea of how big things should be in relation to each other, how wide a chair should be, how deep a cupboard should be, etc.
Well, after figuring these things out, I get on with the drawing. Once the sketch is done:
I inkt it:

And color it in a bit:

Hoi Charles,
BeantwoordenVerwijderenleuk om je werkmethode te zien.
Moet je meer doen.
Groeten,
Erwin